CARB TEMPERATURE
Building An Inexpensive Carb Air Temperature Sensor
Mike Dwyer
I learned a quick lesson on carb icing the other day as I turned base and pulled the carb heat. The engine stopped. I remember thinking “you got one chance to nail this landing, no going around this time”, “get the nose down your loosing too much airspeed”. A few seconds later we turn onto a very quiet final with a 5000 foot runway under the nose we flare and commit a squeaker landing. We’re down and the prop is stopped as we roll down the runway looking for a turn off. Sure I’ve practiced dead stick landings but having a real live engine that can fix bad approaches now seems like cheating. After making a really nice landing and rolling to a stop I had a few quiet minutes to think about what caused the flame out. After 5 minutes I decided to start up the engine and it ran fine… Humm, carb icing. 20+ years of flying and this was my first for real dead stick landing.
Back home I did some web searching on carb icing and found that I had been flying at the worst conditions for carb icing, around 65 degrees and 50 % humidity – a beautiful day. My first thought was to install a commercially available carb temp meter but most were analog meter movements. I’m not attracted to those needle pointy things, digital is for me. I found a few digital ones but wow, big bucks. Did I mention I’m cheap also, but hey we are homebuilders aren’t we, let’s build one!
I remembered a old inside/outside digital thermometer that I’d thrown in the junk box years ago. I dug it out but it no longer worked, why do we save this stuff? Looking at the outside temp sensor it was apparent that the actual sensor was really small Blue thing with a white top. The Blue thing is a Thermistor, 1% accurate, 10K ohm at 25C. Now that I’ve been looking, I see these little Blue sensors on many temperature gauges, they seem to be fairly standard.
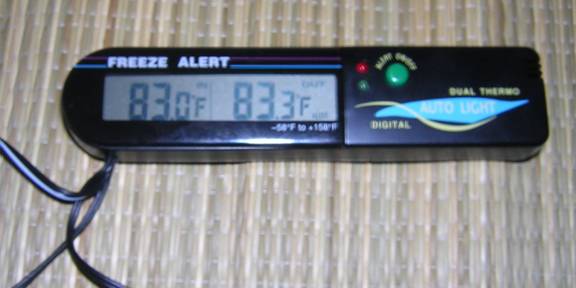
After an extensive web search looking for Digital Inside/Outside thermometers I found this nice little JC Whitney dual display job. At $19 + $8 shipping it fit my price range. It displays two temperatures at the same time so no button pushing to see “Inside or Outside” temp. It also has flashing lights and beeps when the Outside temp goes near freezing. It runs off 14 Volt aircraft power or an AAA battery.
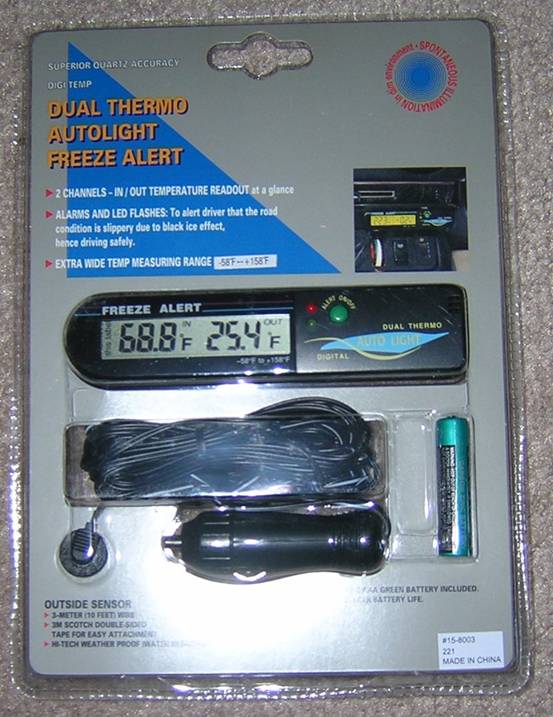
I ordered it online and in a few days it was on my doorstep. We must play with this right away. I inserted an AAA battery into it, put the outside air temp sender into a small glass of water, and stuck it in the freezer. Just do it and don’t try to explain to your wife that it’s for your airplane. From your old high school science class you remember that as water freezes it stays at 32F for a long time. This test let me confirm that this thing is very accurate, better than +- 0.5 degree F. As the water temp dropped to 37F the thing started flashing and beeping. This is going to be perfect for carb temp!
Now onto making this work in the airplane.
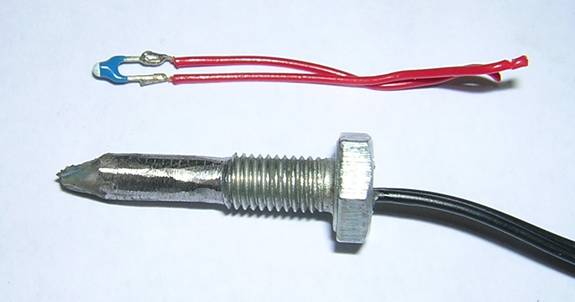
Outside Air Temp is going to be my Carb throttle plate temp. You have to use this one in the carb throat as this sensor has the temperature warning that is so cool. I took the Outside air sensor and carefully cut out the Blue pickup. This thing is pretty small and delicate so don’t rip the leads off it! My MA3SPA carb has a ¼” x 28 plug in the front of the carb throat (convenient). My sensor must screw into this hole in my carb which is just above the throttle plate. I took a ¼” x 28 hex head bolt about an inch long and drilled down the center of the bolt. I then ground off the threads from the sensor end (not critical but makes it easier to install). I ran the wire from the sensor thru the center of that bolt and then injected epoxy into the hole to fill the gap. Be careful not to let the sensor leads short to the metal bolt. Use some small heat shrink tubing over each lead. Put a small piece of duct tape around the sensor to keep the epoxy from running out, then remove the duct tape after cure. Over night it cured and was ready to install.
Inside Air temp. I wanted to use this sensor to measure the air going into my carb. For instance when you pull the carb heat how much heat do you actually get going into the carb? I had no idea. So if you want to do this, get ready for the more delicate surgery. We are going to remove the Blue thing internal to the JC Whitney gauge and replace it with a wire leading outside the unit. I took the JC Whitney gauge and removed three bigger screws from rear of the case which then just splits in two. Easy so far.
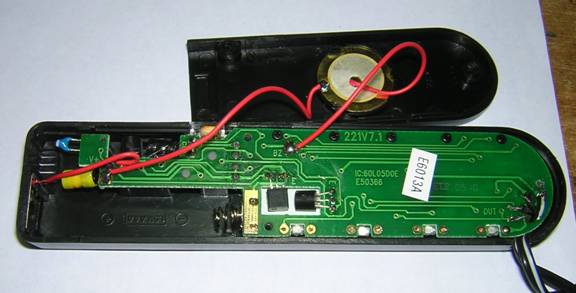
Then I took 5 real small screws from the PWB (see the row of screws along the top) and carefully lifted off the PWB exposing the Blue thing (see the picture to the left).
I used my pencil soldering gun and removed the
Blue thing and installed a twin lead wire in its place. I carefully put
the JC Whitney gauge back together, now with an extra wire leading
outside the unit. 
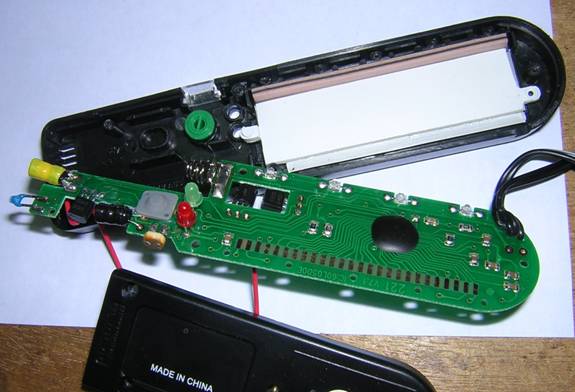
All Back together again with one extra wire coming out!
I installed the inside air sensor into my carb elbow at the throat of the carb, this will sense the air temp going into the carb and allow me to find out if my carb heat system is working properly.
I installed the outside air temp sensor bolt into my carb throat near the throttle plate. I used some anti-seize on the steel bolt threads so it wouldn’t seize on the aluminum carb threads. I also placed a nut near the bolt head to help lock the sensor to the carb. A real easy installation it turned out. Make sure your throttle plate still fully moves unrestricted after the installation.
Testing. The next weekend was a beautiful 85 degree day and our mission was lunch in Venice. That’s Venice Florida not Italy. In flight the air going into my carb was showing 80F and my carb throttle plate in cruise flight was 44F. Wow, big temp drop, 36 degrees. No wonder 65F is a dangerous outside temp, 65-36 = 32F. I applied carb heat in cruise and found my carb air temp rose to 57F. It probably would have kept going up a bit more but I turned it off. On descent at idle I pulled the carb heat and got no rise… I speculate that the air flowing past the exhaust pipes keeps the pipes cool at real low power. Note to self, use the carb heat before reducing power…
Conclusion. This is a great tool for safer flying and at $27 it is in everyone’s budget. It is interesting to see what is going on with your carb air. Not to forget, it puts one more gauge on your instrument panel that you can play with and amaze your passengers.
Author. Mike is an active home builder with 1600 hours of homebuilt flying time from the Warner Sportster, Volmer VJ22 amphibian, and his Q200. Mike is currently restoring an Osprey 2 amphibian. Mike works for Honeywell as an electrical engineer and holds 8 patents related to inertial navigation and electronics.